- Record frame up to 120 fps
- Stable game recording performance
- Record and edit your videos with powerful features
How to Allocate More Ram to Minecraft in 2025 - 3 Methods

May 19, 2025• Proven solutions
Minecraft is a game that allows players to create their own worlds, explore new places, and build amazing structures. However, adding mods and textures can increase the game's memory usage, leading to performance issues like frame stuttering, slow loading times, or even crashes. To enhance your gaming experience, it's important to know how to allocate more RAM to Minecraft.
In this article, we'll provide a step-by-step guide on how to allocate more RAM to Minecraft using three popular launchers.
This article contains:

Wondershare Filmora - Minecraft Game Recorder
Part 1: What Happens If I Allocate More RAM To Minecraft?
Learning how to dedicate more RAM to Minecraft can improve performance, especially when using mods, large resource packs, or high render distances. With more memory, the game has more space to load textures, run background processes, and handle world generation more smoothly. This usually leads to faster load times, fewer frame drops, and a more stable gameplay experience overall.
However, giving Minecraft too much RAM can also cause problems. Java, the programming language behind Minecraft, doesn’t always manage large amounts of memory efficiently. If you allocate more RAM than your system can handle, you may slow down your entire computer or even cause crashes. Other applications running in the background might lag or stop responding.
In short, increasing RAM allocation helps Minecraft perform better, but only to a point. It’s about balance. Most players see good results with 4 GB to 8 GB of allocated RAM, depending on their setup and the version of Minecraft they're using. Before changing anything, always make sure your system has enough RAM available and close other apps when playing.
Part 2: How Much RAM Should I Allocate to Minecraft?
The amount of RAM you should allocate to Minecraft depends on your system's total memory and how you play the game. Below are some general guidelines:
- 4 GB RAM system: Allocate 1 GB to 1.5 GB. This is the bare minimum. You’ll need to keep background apps closed for smoother gameplay. Avoid heavy mods or high render distances.
- 8 GB RAM system: Allocate 2 GB to 4 GB. This setup can handle standard Minecraft with a few lightweight mods. It balances performance with system stability.
- 16 GB RAM or higher: This is a more comfortable spot. Allocate 4 GB to 8 GB. Ideal for running modpacks like Pixelmon or RLCraft, using shaders, or exploring massive worlds. Don’t go overboard, though. Allocating more than 8 GB is usually unnecessary and can even hurt performance.
As a rule of thumb, never allocate more than 50% of your total RAM to Minecraft. Your operating system and other apps also need memory to run properly. If your system starts slowing down or crashing after adjusting RAM, reduce the amount slightly and try again.
The key is to give Minecraft enough room to breathe without suffocating the rest of your computer.
Part 3: How To Check How Much RAM Is Currently Allocated to Minecraft?
If you're not sure how much RAM Minecraft is using, you can easily check it through the game’s built-in debug screen or your launcher settings.
Method 1: Use the F3 Debug Screen
First, here’s a quick method to check allocated RAM through Minecraft itself:
Step 1: Launch Minecraft. Enter a world or server.
Step 2: Press F3 on your keyboard (or Fn + F3 on some laptops).
Step 3: Look at the top-right corner of the debug screen. You’ll see a line like: “Mem: x x x 2048MB (Allocated).” This tells you how much memory Minecraft is currently using and what’s been allocated.

Method 2: Check via Minecraft Launcher
Now, from the Minecraft Launcher (official version), here’s how to check the dedicated RAM:
Step 1: Open the Minecraft Launcher. Then, click Installations.
Step 2: Hover over your version and click More Options. Under JVM Arguments, look for something like -Xmx4G. The number next to Xmx shows how much RAM is allocated. For example, -Xmx4G means 4 GB of RAM is allocated.
Knowing how much RAM is allocated helps you decide whether to increase or decrease it based on your system’s performance. For other unofficial launchers, it’s best to check the forums or official guides for the apps.
Part 4: How to Allocate More Ram to Minecraft
Note: These methods apply only to "Minecraft: Java Edition" and are not applicable to other editions like "Bedrock" (also known as "Minecraft for Windows 10"), which lack built-in options for RAM allocation.
Method 1: How to allocate more RAM to Minecraft using Default Launcher
If you love to play Minecraft it is impossible that you would not have heard of Minecraft Launcher. It is the most common Minecraft Launcher that is used by so many players all around the world.
Step 1: Open Minecraft Launcher and navigate to the "Installation" Tab.

Step 2: Under the Installation, tab clicks on the three dots located on the right of the "Latest Release" and select "Edit".

Step 3: It will open a new window that contains the settings of Minecraft. Now click on the "More Options".

Step 4: Scroll down to "JVM Arguments". Here you can see the text. The "2G" in this text represents the 2 Gigabytes of RAM. Change it to the number of Gigabytes that you want to allocate to Minecraft. In this case, we are changing it to "4G", which means 4 Gigabytes. Leave the rest of the text as it is and hit "Save".

Step 5: Now go to the "Play" tab, hit Play, and enjoy playing Minecraft with more RAM for a smooth and better experience.

Related Topic:How To Record Minecraft Gameplay Like a Pro: Best Tools
Filmora Game Recorder can capture any area of the PC screen and webcam. It's perfect to capture and streaming the game process without using much RAM. Plus, you can edit the game recording video files in Filmora directly! Worth to have a try!


Method 2: How to allocate more RAM to Minecraft using CurseForge Launcher
After Minecraft Launcher, CurseForge is the second-best launcher for Minecraft. It allows you to change the Memory you want to allocate to Minecraft according to your needs.
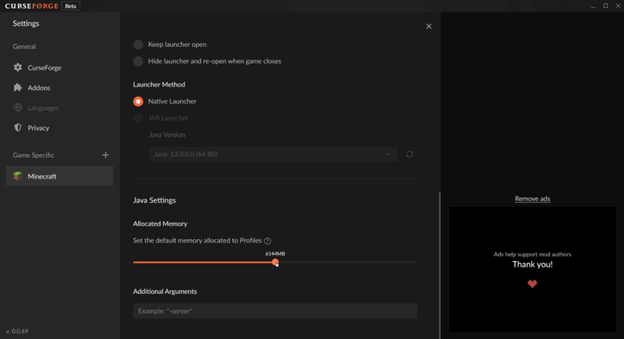
Step 1: Open CurseForge Launcher and click on the Settings icon located at the bottom left corner of the window.

Step 2: Under Game Specifics, which is located on the left bar of the CurseForge, click on Minecraft. It will open the settings related to Minecraft.

Step 3: Scroll down to Java Settings. Under Java Settings, you will find a bar to control the Allocated Memory. Arrange it according to your need and requirement of the memory you want to allocate to Minecraft. Hit the Cross (X) on the top and enjoy playing your favorite game without any glitch or crash.

A cross-platform tool for making videos anywhere for all creators!
Why your video editing isn't good enough? How about some creative inspo?
- 100 Million+ Users
- 150+ Countries and Regions
- 4 Million+ Social Media Followers
- 5 Million+ Stock Media for Use
 Secure Download
 Method 3: How to allocate more RAM to Minecraft using ATLauncher
ATLauncher is another famous and widely used launcher for Minecraft. It also has a feature to control the memory you want to allocate to Minecraft. Let's proceed to how to allocate more RAM to Minecraft.
Step 1: Open ATLauncher and navigate to "Settings".

Step 2: At the top of the settings page, you will some tabs. Click on the Java/Minecraft. It will open the settings related to Minecraft. Under these settings, change the "Maximum Memory/RAM" according to your needs and hit "Save". It will allocate Minecraft with the memory of your choice to let you play Minecraft in the perfect way possible.

Part 5: How Do I Record Minecraft Gameplay?
Once you’ve learned how to allow more RAM for Minecraft and your game is running smoothly, you might want to capture your gameplay, whether it’s building epic structures or exploring custom modpacks. Recording Minecraft is a great way to share your experience with others or simply save your progress.
Use Filmora Screen Recorder
Wondershare Filmora offers a built-in screen recorder that works well for Minecraft. It’s simple, beginner-friendly, and lets you record both gameplay and your voice at the same time.
Once you finish recording, your gameplay appears on the timeline for easy editing. You can trim, add effects, insert text, and export it directly to YouTube or your computer. Here’s how to record Minecraft gameplay using Filmora:
Step 1: Go to Screen Recorder from the homepage.

Step 2: Then, go to File > Record Media > Record PC Screen.

Step 3: Then, make sure to select Target Window on the recording toolbar. Choose whether to record Microphone, System Audio (recommended for gameplay), and Camera as well. Once done, hit the red record button. To end the recording, click the red button again or press F11 on your keyboard.

Other Options
You can also try OBS Studio (free but complex) or Xbox Game Bar (Windows only). However, for a balance of ease and editing power, Filmora is a great all-in-one solution—especially if you want to make polished Minecraft videos.
Overall, learning how to allocate more RAM to Minecraft and understanding its function in ensuring smooth gameplay is key. While RAM is not the sole determinant of how your game will run, it’s great to learn how to manage it. It’s important to strike the right balance based on your system’s available memory.
Once your game is running smoothly, recording your gameplay becomes the next step for sharing or reviewing your builds and adventures. For that, a reliable screen recorder makes all the difference. Wondershare Filmora not only helps you capture high-quality footage but also gives you the tools to edit, enhance, and export your Minecraft videos easily, all in one place.
Learn how to make a beauty video with Filmora on your PC from the ground up. We will also give you some tips on how to record videos.
by Ollie Mattison May 16, 2025 18:08 PM
Level up your gaming content with the perfect game video background music! Learn how to choose, add, and sync music to your gameplay—without copyright worries!
by Ollie Mattison May 16, 2025 18:08 PM
Level up your Free Fire videos with epic intros! Check out the best Free Fire intro of 2025 and learn how to create your own stunning intro in this piece.
by Ollie Mattison May 16, 2025 18:08 PM
Ollie Mattison
staff Editor
