
 100% Security Verified | No Subscription Required | No Malware

Watching videos without subtitles can feel like trying to solve a puzzle with half the pieces missing. Maybe the audio isn't clear, the language is tricky, or there's just too much background noise.
Since VLC is one of the most popular video players out there, it's no surprise people are looking for ways to use VLC auto subtitle features. The good news is you don't need to be a tech wizard to make it happen.
Today, we're keeping things simple and showing you exactly how to set up VLC media player auto subtitles in just a few minutes. And if you want something even more powerful than the usual VLC auto caption setup, we've got you covered with some other handy tools too!

In this article
Part 1. How to Make VLC Auto Generate Subtitles for Any Video
On January 9 at the 2025 Consumer Electronics Show in Eureka Park, VLC Media Player gave a sneak peek of its new AI tools that can automatically add subtitles to any video you watch. What's even cooler is that this VLC auto subtitle generator feature works offline and can even translate subtitles in real time.
So if you've ever struggled with hard-to-hear dialogue or foreign languages, VLC player auto subtitle tools might just be your new best friend. No more hunting for subtitle files or guessing what's being said.

But here's the problem… At the time of writing this article, the auto subtitle generator VLC promised has yet to be released. For now, the only option is to use the VLsub extension as a temporary workaround.
But if you haven't tried it before, no worries. We've got a simple guide below that shows you how to auto-upload subtitles in VLC using the VLsub extension.
Step 1. Access the VLsub extension
If you've got the latest version of VLC, the VLsub extension should already be included. So, visit the official VLC website, download the newest version, and install it. Once it's set up, open VLC, click on "View", then choose the "VLsub" option from the menu.

Step 2. Find and add the subtitle
Next, pick your preferred language and type in the movie title. You can search by name or use the video's hash. Once the results show up, scroll through, pick the one that fits best, and click the "Download Selection" button to upload the subtitles.

Step 3. Preview the subtitles
VLC will usually add the subtitles to your video right after the download. Hit play and see if everything lines up. If it looks off or doesn't show up, just go to the Subtitle menu and load the subtitle file yourself.

While the idea of a built-in VLC auto subtitle generator sounds great, in reality, you can't even use the feature yet. Not to mention, the VLsub extension in VLC is still a bit hit or miss. Sometimes it works, sometimes it doesn't, and that can be pretty frustrating when you just want subtitles that actually sync.
To help you decide if using VLC Media Player auto subtitles is right for you, here's a quick look at the pros and cons of the feature.
Part 2. When VLC Isn't Enough: A Smarter Way to Auto Subtitle Videos
As mentioned above, VLC does have some useful features like VLsub, but it's not really a full-on auto subtitle tool just yet. So if you want something more reliable for adding captions, you're better off using a different solution.
Thankfully, there's Wondershare Filmora to save the day! Unlike VLsub who doesn't actually generate subtitles in a VLC player, Filmora actually has features to auto-caption your videos quickly and accurately. It's the perfect solution to your worries.


Here's why Filmora makes subtitle generation way smoother and more reliable than VLC:
- Multiple Ways to Generate Captions: Filmora gives you options. You can use Auto Caption, speech-to-text, or even AI Translation to get your subtitles done fast.
- Various Preset Templates: Filmora's auto caption offers a variety of preset templates for caption animation, making the creation process easy and stunning.
- Full Control Over Subtitles: Once your subtitles are generated, you can tweak the animation, fix the timing, and change the text to make everything just right.
- Complete Editing Toolkit: After adding subtitles, you can keep editing your video with pro-level tools to make it even more polished and engaging.
- Quick Sharing: When you're done, you can save it to your device or post your video directly to TikTok, YouTube, Instagram, and more without leaving the app.
Not to mention, Filmora is available on Windows, macOS, Android, and iPhone, making it accessible for you to generate subtitles no matter your device. On top of that, even with all these great benefits, Filmora is still budget-friendly. It offers flexible pricing plans and even a free version so you can try it out first before fully committing to subscribe or make a purchase.
So, there's really no reason not to give Filmora a shot. It's the perfect fix since VLC's auto subtitle generator isn't cutting it. Now, let's walk through how to use Filmora's auto caption feature and start creating subtitles the easy way with this step-by-step guide below:
01of 05Launch Filmora and start a new project
First, check that you've got the latest version of Filmora installed on your computer. If you don't have it yet, visit their website, download it, and install it on your device. Once that's done, launch the app and hit "New Project" to begin.

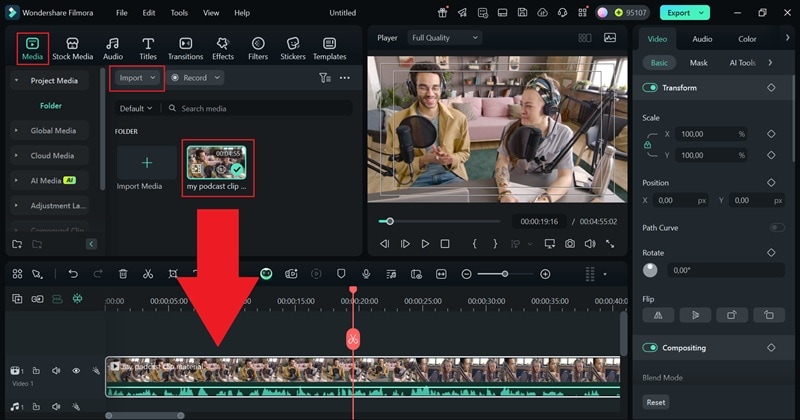
02of 05Upload your video clip
Now, let's say you've got a podcast video and you want to add subtitles to make it easier to follow. Just go to the "Media" tab in Filmora and click "Import" to upload your video. Once it's in, drag the clip down to the timeline below.
03of 05Access the Auto Caption feature and generate subtitles
Now, go to the "Titles" menu and click on "AI Caption". Choose the "Dynamic Caption" option.

In the window that pops up, pick the language that matches your video's audio, then hit "Generate". Give it a few seconds while Filmora works its magic.

04of 05Change the subtitle template and edit the video if necessary
Once it's done, the subtitles will show up automatically on your video and timeline. Click on the caption track, go to the "Text" tab, and check out the "Templates" section to browse different subtitle styles. Pick the one you like, then click "Apply to All" to use it across the whole video.

If you want to take your video to the next level, go ahead and explore Filmora's features and media library. You can add music, text, filters, stickers, cool video effects, and so much more. Get creative and have fun with it!

05of 05Save and share your video
When you're done editing, click "Export" in the top-right corner. Choose "Local" to save the video to your device, or pick "Social Media" to upload it straight to your chosen platform. Before exporting, check the title, format, and quality to make sure everything's good to go.

Part 3. How to Auto-Generate Subtitles in Your Phone Without Breaking a Sweat
As you can see, Filmora's Auto Caption feature actually works, unlike VLC's auto subtitle generator. It listens to the spoken words in your video and creates real subtitles, not just adds an SRT file like VLsub does.
What makes it even better is that the same feature works just as smoothly on mobile, so you can subtitle your videos easily right from your phone too. And while VLC does have a mobile version, it faces the same issue: the VLC auto caption feature isn't available yet. On the other hand, with Filmora Mobile App, you get an easier and more reliable way to generate subtitles without any stress.

 secure download
 So, let's learn how to generate subtitles to your video with Filmora Mobile! Just follow this easy guide to get started:
01of 05Open Filmora and import your video
If you don't have Filmora Mobile yet, grab it from the Google Play Store or Apple App Store. Once it's installed, open the app and tap on "New Project" to get started. Choose the video you want to use from your phone and tap "Import". This will bring your clips into the main editing timeline, where you can start working on your video.

02of 05Access the AI Caption feature
To add subtitles automatically, tap on the "Text" menu and choose "AI Captions". This will open up the AI Captions panel, where you'll find different tools to help you customize and improve how your subtitles look and feel.

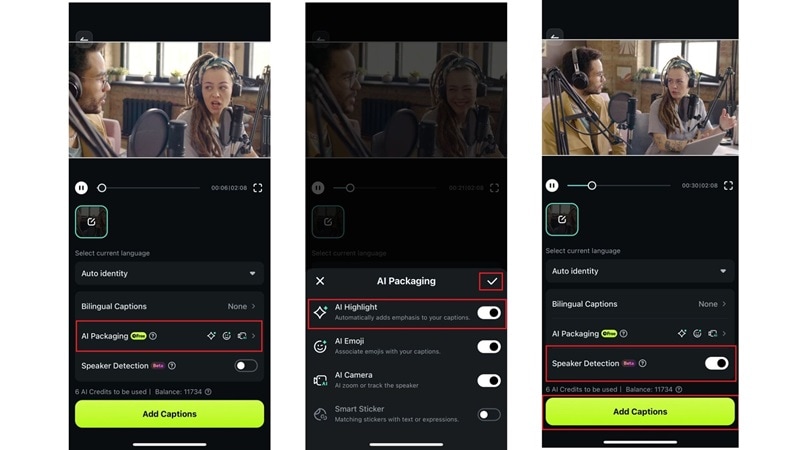
03of 05Turn on AI Highlight, Speaker Detection, and Captions
In the next screen, tap on "AI Packaging" to see all the tools you can use. Switch on the options you want, like "AI Highlight". Then hit the checkmark to save it. Don't forget to enable "Speaker Detection" too. After that, tap "Add Captions" and let Filmora's AI do the work of generating subtitles for your video.
04of 05Pick a style and tweak your subtitles
After Filmora finishes generating the captions, go ahead and choose a style you like from the available templates. You can export your video right away, or tap "Project Editing" if you want to fine-tune it a bit more.
In the timeline, you'll see your subtitles already added to the video. You can move them around, change the size, switch up the font or style, and even edit the text if needed. Just swipe through the menu to explore all the editing tools available.

05of 05Add final touches and save your video
Now it's time to give your video a little extra flair. You can add filters, cool effects, background music, stickers, and anything else to make it stand out. Once you're happy with how it looks, tap "Export" in the top right corner. Choose the resolution you want, tap "Export" again, and your video will be saved and ready to share on Instagram, TikTok, or wherever you like.
 secure download
 Conclusion
On VLC's official Twitter, there's been talk about a new VLC auto subtitle generator that can work offline and in real-time. Unfortunately, the VLC auto caption feature still hasn't been released. For now, users are stuck with VLsub, which only lets you upload SRT files to your video and doesn't actually auto-generate subtitles in the VLC player.
Thankfully, Wondershare Filmora offers the perfect solution. Unlike the VLC auto subtitle feature that's still missing, Filmora's auto caption tool is real and works great. It can generate subtitles directly from your video using AI, and it's available on Windows, macOS, and even on mobile for both Android and iPhone. It's a solid choice while we wait for VLC media player auto subtitles to finally be released.

